Best computer and mic to make hypnosis, ASMR, podcasts and more
Table of Contents
Good creators with bad hardware are simply ignored
Don’t let that be you! It doesn’t matter how great your content is — you could have a mesmerizing voice, a great idea, execution, and even the cojones to post it up online… but if your equipment sucks, your content sucks. And the amateur audio community has heard far too much of this. There’s nothing worse than having someone serenade you with a recording of their voice, only to hear some grainy background noise, recording blips, and pops.
Luckily, you do not need a professional studio to make acceptable audio tracks. Top-quality tracks require a studio, but for most people, a home-recording situation is fine.
It can be a daunting task to begin your journey, but that’s what this guide is for. Once you figure it out, you can forget about it and get to the critical inch– your art. Get right to the part where you are making recordings so good, that people feel pleasured and inspired when they hear it.
What if I’m recording just for me?
You might plan to record your University notes to listen to later. Or you just want to record hypnosis for yourself (you can use these scripts if you aren’t comfortable writing your own), or record your own affirmations. If it’s just for you, then just record your audio with a headset mic.
Making you sound better than you do in real life
Good hardware can make you sound that much better. Many people claim that their recording setup makes them sound even better than they do in person.
Wow, I sound awful! That’s perfect for me.
A great setup can create a deep, full bodied voice for men, especially when you use a nice dynamic microphone for the ‘broadcaster’ sound. For women, they open up those silky highs, plus a sensual Miley-Cyrus-growl in the lower end. The upgrade might be worth it, whether you’re in love with your voice, or you think your voice is the one that could use an upgrade.
Check out this 20-second example of a cheap headset microphone:
Compare it to a little more of a professional setup (you might need headphones to really see the difference):
Making the greatest stuff with any type of audience
Always create your best work, whether you’re making hypnosis tracks, guided meditations, YouTube voiceovers, podcasts, or content for your favorite subreddit (GWA, anyone? PillowTalkAudio?). Use good equipment, then let your unique personality shine through. People really notice when you’re going ham on it. That’s when you get the fans.

Desktops for audio recording/editing
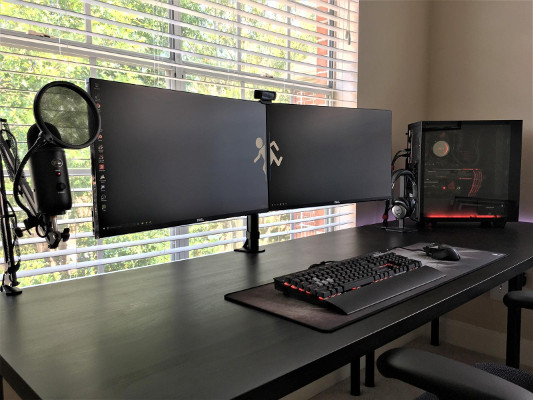
Building a PC is actually quite easy (you should never buy a prebuilt PC) and there are always communities like r/buildapc if you need any help at all. An audio editing PC should be custom built so that you have the best parts for making audio. Focus on speed and silence when you build or upgrade your computer for audio creation. You might enjoy other features too, like high quality onboard sound. Then you can hear how terrible great it sounds.
When should you choose a desktop as an audio creator?
- You want to pay less and get more power.
- You don’t mind the size/lack of mobility.
- You also make videos.
- You like having a ton of ports to jam it in.
- You enjoy occasional breaks from work so you can play games like the filthy casual that you are.
Good components for audio creation
Processor– Most modern processors (CPUs) will work fine for audio recording, but audio editing is primarily single threaded, meaning that clock speed will be the most important factor for fast editing. Get a relatively new CPU too, because 7 year old parts wont do you much good, even if the clock speed is high.
A good value choice is the Core i3-7100 at 3.9 Ghz or G4400 at 3.3 Ghz if you want to save some money.
CPU cooler– One of the loudest components in a system. Stock fans tend to be quite loud. The cheapest, most silent option is the Pure Rock cooler from Be Quiet.
Motherboard– The choice of motherboard will generally not affect audio recording, so choose whatever one you like (Though it may be a good idea to choose one with good audio, like the Z370A)
RAM– Despite what a sales rep might tell you, you rarely need a lot of RAM, especially for making audio (splurge if you are a video editor or gamer, though). Save money and just get a 4 or 8 Gb stick of RAM if you’re just making audio. You can always upgrade later.
Power Supply– Most PSUs from a decent brand will be pretty silent, but the best ones come from Be Quiet. You will not need a very high wattage unless you want a GPU for gaming/video editing.
Graphics Card– You generally do not need a dedicated graphics card for making audio recordings. But if you need one, then choose a card that has a silent cooler, like the MSI Twin Frozr design or Asus Strix
Storage– SSDs are best because of their silent operation, but large storage capacities will be expensive. If you need an extra hard drive, go with a 2.5 inch drive. These hard drives are smaller and make less noise (these are the same ones used in laptops). You’ll sacrifice a little speed, but silence is more important here. Don’t forget to back up your data every month!
Case– Choose a case with silent fans like Bequiet or Fractal Design, or you can get any case and replace the fan(s) with one from Noctua or the bequiet Silent Wings 3. Be Quiet also makes great Cases, but they are very large and expensive.
If you want to see full builds at any budget, check out Logical Increments. It’s an amazing website that will show you exactly what kind of parts you should be getting, based on your budget.
Always get the latest generation!
Hardware comes in generations, usually a new one every year or two. So whether you are buying an Intel or AMD platform (or other), it’s generally best to buy the newest generation.
Why? This guarantees the best battery life/power efficiency, longevity, up-to-date ports, upgradeability, speed, and general compatibility with future stuff. Don’t let the seller fool you. You can find out if it’s the latest stuff by looking up the CPU number and checking the release date. Make sure it’s within the past year or two. A lot of retailers would love to send you out the door with a computer built on an old platform that looks similar to today’s tech but doesn’t work as well– mostly so they can get rid of some old stock.
If you know a lot about computers, buying some older parts will be fine. But if you’re not a tech know-it-all, play it safe and get the latest platform. The lower end of today’s computers is often still better than the high end of yesterday.
Recording audio on a laptop
The same basic concepts apply for laptops. You do not need a powerful computer to record this kind of audio or edit it at a decent speed (unless you are making music or videos), but you will want a laptop that is silent. Many new laptops will not make any sound unless they are under a high load. Check the reviews.
A lot of laptops today have no fan at all (but they generally have weaker CPUs). Many 2-in-1’s are like this. Look for laptops with a core m3 processor, because they are passively cooled. Choose one of these if you don’t need that much power.
Silencing a laptop:
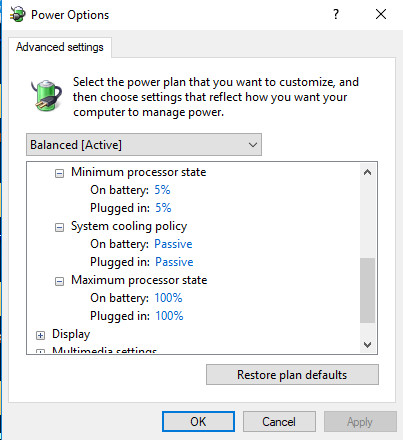
Go to power settings, find advanced settings (will be slightly different depending on your operating system, look for a window called ‘power options’. You can search with your computer’s search bar).
Set your maximum processor state as low as you can, without making your computer too slow. This setting WILL SLOW DOWN YOUR COMPUTER, but your fans will be much less likely to ramp up. Turn the settings back up after you are done recording if you need the extra speed. Also set the cooling to passive instead of active (this will encourage the fans to slow down and produce less noise). Remember– this may make your computer run hotter than normal.
Also, you only need to do this if you have a particularly loud fan!
Recording on a mac
You pay more, you get more. Great computers for a terrible price. Most macs should be fine for this kind of audio recording. Apple does not like fans, and certainly does not like noise (even if the noise reduction comes at the cost of performance). Plus, they love including support for creative-user programs. Programs like audacity work on any platform, plus you’ll find a whole suite of other audio programs on mac, too. The macbooks have decent speed, run quiet, and are made with creators in mind. Check your microphone hardware for compatibility before you buy it (some USB interfaces will not have proper drivers with mac, for example. Check reviews). For your audio interface, you might also need a USB type-B to type-C cable if your mac has no regular USB ports (also known as type-A. It can be confusing, I know).
The track pads, keyboards, and speakers are also pretty much heavenly on macs.
Computer accessories for audio recording
Silent mouse
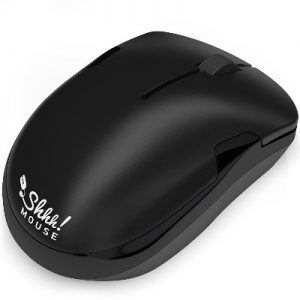
Get a mouse that doesn’t make any noise while you are recording. You may have to use the computer at the same time. It can really kill the vibe and ruin the illusion if your mouse clicks can be heard in your recording. There are not many products out there, but there is this mouse, which is almost entirely silent. The tracking on the mouse isn’t very good, but it does what it’s supposed to do.
Silent keyboard
Depending on the type of audios you make, you might be using the keyboard at the same time that you record. Hearing those clicks can be very annoying. Note that silent mechanical keyboards may not be totally silent, even if they are superior to regular keyboards in terms of typing experience.
You can find more info on silent computers at the Silent Pc Review Forum
Recording on phone or tablet
Using your phone to make audio recordings is not the most optimum, but some of us don’t really have any other choice, so here’s a few tips:
-Research apps that work with external mics and check if the mic works with your phone at all. Look it up before you buy it!
-It’s best to use a microphone with a battery. Then the mic doesn’t have to draw power from your phone, which will cause static, making you harder to hear.
-Get a cardioid pattern microphone if you are just recording yourself. This will reduce the background audio that is so common with mobile recording.
-Experiment with the noise reduction if your recording app has it (It is usually best to just leave it off).
-The best part about recording on your phone is the mobility. Try recording in the closet — the clothing in your closet will absorb any reverb, plus the closet will protect from outside noise.
-Watch your recording loudness levels. If it goes into the red, you MUST move farther from the mic. Maxing out your microphone will make your recording very irritating to listen to.
-If you’re using Apple, you’re in luck. It’s much easier to find apps that work with an external mic compared to Android. Don’t give up hope with Android though, as you can still find some apps that may work.
Recording Equipment Tiers
Computers may change every single year, but microphones tend to stay the same, for the most part. The same tried-and-true microphone that Michael Jackson used to record Thriller is still commonly used today.
Potato Setup (pauper level)

- 1 Decent quality USB headset (That’s it. That’s all you need)
The absolute cheapest way to get started is to use a headset to record your audio. Here’s a great guide on quality headset mics you can get.
It wont sound the greatest, but it’s fine if you just want to get your feet wet. In fact, I made hundreds of dollars just doing custom recordings with a Turtle Beach gaming headset. But after that, it’s definitely time to upgrade.
Beginner Mic Setup
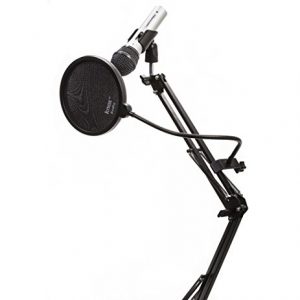
- ATR2100 Microphone
- Pop filter
- Microphone stand
A simple USB or XLR mic will sound much better than a headset, without breaking the bank. The ATR2100 is the gold standard of value microphones. Even guys like Tim Ferris (author of The 4-Hour Workweek) still used this microphone years after becoming wildly successful. Use this microphone if you have a lot of background noise. It does an excellent job of ignoring everything that isn’t 2-4 inches away. The only drawback is that you will need to speak loud and clear, because this microphone does not have very good gain (loudness level).
Advanced Mic Setup
- Dynamic or Condenser XLR microphone (your choice, see below)
- USB Audio Interface
- Mic stand
- Pop filter
Dynamic mics vs condenser mics – I wont go into too much detail, as there is plenty of good info from professionals elsewhere. Here’s the gist of it. A dynamic mic usually picks up sound from subjects that are closest (best for areas that are a little more noisy) , and condenser mics take in sounds from all around the room (best for areas that are very quiet).
The most common high-end dynamic mics are the Shure SM7B (as seen on the Joe Rogan podcast and other top podcasts), and the Rode Procaster if you want to spend less (I swear by this microphone, as it sounds nearly as good as the SM7B, but costs almost half)
Note for dynamic mic users: You ever notice how it always has that little “hum” in the background, even if you are in a completely silent place? That’s the 60 Hz vibration being picked up by your mic. All dynamic mics do this, and it’s usually caused by the vibration of electricity connecting to your house and flowing through it. You can remove background sound using a noise removal tool in your audio editing program (like audacity).
For high-end condenser mics, the variants of the Blue Yeti and Blue Yeti Pro are extremely popular for all usages. On the cheaper end, the AT-2020 is the go-to microphone.
USB Interface – Any really decent audio setup will feature a USB interface, which turns an analog signal into a digital one, then drives that right into your computer. The Focusrite Scarlett Solo is the best value option if you have just one mic (or instrument, for that matter).
Preamps – You can use these to increase the loudness levels of your recordings, and it can increase the clarity as well. I like to use a simple Fethead for this because of it’s tiny size, but many people also love the Cloudlifter, which is often used to boost the SM7B.
Microphones for ASMRtists
When we’re talking audio quality, things get a little hazy in relation to ASMR. This is where the science becomes an art — because sometimes a lesser quality mic is preferred. Yes, it’s strange, but some people are awed by the hiss of an awful microphone setup (and everyone has slightly different triggers, it seems). The point is to experiment. You really need to get your hands dirty, so to speak. Find your own unique style, and the equipment that works best for that in particular. Make friends with your hardware. Find out how close it will pick up your breathing. Find the quirks and imperfections, then make use of it.
Dual mic setup for left and right stereo – If your USB interface has 2 XLR inputs, you can actually plug in two mics and make each one record for a different side. This is really great for all those ASMRtists that like to really give the listener a sense of presence by varying which ear they speak to. The effect is also great for hypnosis, and can really takes the listener on a wild trip.
This is a much cheaper way to get this effect without those ear shaped double microphones that cost nearly $1000 (like the 3dio)
For making Music
Creating music is much more hardware-intensive than simple voice recordings (adding a background track doesn’t count, because that doesn’t need much power to do). If you’re making music, you’ll need to considerably bump up your hardware specs. Your DAW will have strong computing requirements and it’s crucial that there is enough power, especially if it’s crunching sound effects and reverbs (as it would need to calculate a room, and how the audio bounces around in that room). You will need a recent quad-core or better CPU and 16 Gb of RAM, along with any other additions needed for your type of music (but this is far beyond the scope of this post and you’ll need to search elsewhere).
Check out this free guide on vocal quality
Christopher Lloyd Clarke is well known in the royalty-free audio and hypnosis community. He has made a completely free guide on the common mistakes made with audio recording (bless his golden heart). He talks about ways to make your voice sound just right, background levels, pops, blips, and the solution to every common problem you’ll run into. It’s fantastic and you can find his sound quality guide here

Great post! I completely agree with your opening statement. It could be an awesome project, but with the wrong equipment, the content will get over looked. I personally was thinking about starting a podcast in the near future but had not really considered many of these things. Now if I do proceed with my podcast, I know the do’s and dont’s.
Nice post, thanks so much for this sharing!
I’m a certified hypnotist and I’m interested in making some self hypnosis recordings for healing. I’m having trouble finding the right way to do this. I have a MacBook Air and a PC.